As the name suggests, a core feature of Unity's scriptable render pipeline (SRP) is that we can write our own features and add them in without needing to make a whole rendering system from scratch. When I was learning how to make use of this I couldn't find a barebones example to build from, so I'll try to provide one here. Unity does allow you to create a Render Feature asset which provides boilerplate code, but it's not clear to a learner how to make that actually do anything.
This tutorial is written using Unity 2019.3 and targetting the universal render pipeline. We'll not use any experimental features so it should continue to work in future versions. If you're using an earlier version you'll likely need to make some changes. It'll not work at all if you're not using one of the scriptable render pipelines, and may need some tweaking for the HDRP.
Names
| SRP Scriptable render pipeline |
URP Universal Render Pipeline |
| HDRP High Definition Render Pipeline |
|
| Built-in Renderer | |
The scriptable render pipeline (SRP) is what's behind Unity's high definition render pipeline (HDRP) and universal render pipeline (URP) - which was previously known as the lightweight render pipeline (LWRP). Unity projects can still use the built-in renderer which is a separate thing and doesn't use any of this stuff. If you wanted to you could make a joke about how "Unity" isn't very united in its rendering technologies.
Our custom feature will be made up of two classes, one that extends ScriptableRendererFeature and one that extends ScriptableRenderPass. The "pass" is what does the actual rendering work while the "feature" is how it interfaces with the rest of the scriptable pipeline.
If you want a minimal scene with this all set up and working it's available as a .zip download or on GitHub. Unity will take a while to first open the example project as it needs to rebuild the local library. You will also have to manually open the "SampleScene" once the project opens, and may have to restart Unity before it'll properly load everything in.
Boilerplate
Let's jump into the code. We'll create MyBlitFeature.cs and MyBlitRenderPass.cs anywhere within your project's asset folder and paste the code in. It's heavily commented so I'll just pick up on a couple of things to explain separately.
MyBlitFeature.cs
using UnityEngine;
using UnityEngine.Rendering.Universal;

public class MyBlitFeature : ScriptableRendererFeature
{
  [System.Serializable]
  public class MyFeatureSettings
  {
    // we're free to put whatever we want here, public fields will be exposed in the inspector
    public bool IsEnabled = true;
    public RenderPassEvent WhenToInsert = RenderPassEvent.AfterRendering;
    public Material MaterialToBlit;
  }

  // MUST be named "settings" (lowercase) to be shown in the Render Features inspector
  public MyFeatureSettings settings = new MyFeatureSettings();

  RenderTargetHandle renderTextureHandle;
  MyBlitRenderPass myRenderPass;

  public override void Create()
  {
    myRenderPass = new MyBlitRenderPass(
      "My custom pass",
      settings.WhenToInsert,
      settings.MaterialToBlit
    );
  }

  // called every frame once per camera
  public override void AddRenderPasses(ScriptableRenderer renderer, ref RenderingData renderingData)
  {
    if (!settings.IsEnabled)
    {
      // we can do nothing this frame if we want
      return;
    }

    // Gather up and pass any extra information our pass will need.
    // In this case we're getting the camera's color buffer target
    var cameraColorTargetIdent = renderer.cameraColorTarget;
    myRenderPass.Setup(cameraColorTargetIdent);

    // Ask the renderer to add our pass.
    // Could queue up multiple passes and/or pick passes to use
    renderer.EnqueuePass(myRenderPass);
  }
}
MyBlitRenderPass.cs
using UnityEngine;
using UnityEngine.Rendering;
using UnityEngine.Rendering.Universal;

class MyBlitRenderPass : ScriptableRenderPass
{
  // used to label this pass in Unity's Frame Debug utility
  string profilerTag;

  Material materialToBlit;
  RenderTargetIdentifier cameraColorTargetIdent;
  RenderTargetHandle tempTexture;

  public MyBlitRenderPass(string profilerTag,
    RenderPassEvent renderPassEvent, Material materialToBlit)
  {
    this.profilerTag = profilerTag;
    this.renderPassEvent = renderPassEvent;
    this.materialToBlit = materialToBlit;
  }

  // This isn't part of the ScriptableRenderPass class and is our own addition.
  // For this custom pass we need the camera's color target, so that gets passed in.
  public void Setup(RenderTargetIdentifier cameraColorTargetIdent)
  {
    this.cameraColorTargetIdent = cameraColorTargetIdent;
  }

  // called each frame before Execute, use it to set up things the pass will need
  public override void Configure(CommandBuffer cmd, RenderTextureDescriptor cameraTextureDescriptor)
  {
    // create a temporary render texture that matches the camera
    cmd.GetTemporaryRT(tempTexture.id, cameraTextureDescriptor);
  }

  // Execute is called for every eligible camera every frame. It's not called at the moment that
  // rendering is actually taking place, so don't directly execute rendering commands here.
  // Instead use the methods on ScriptableRenderContext to set up instructions.
  // RenderingData provides a bunch of (not very well documented) information about the scene
  // and what's being rendered.
  public override void Execute(ScriptableRenderContext context, ref RenderingData renderingData)
  {
    // fetch a command buffer to use
    CommandBuffer cmd = CommandBufferPool.Get(profilerTag);
    cmd.Clear();

    // the actual content of our custom render pass!
    // we apply our material while blitting to a temporary texture
    cmd.Blit(cameraColorTargetIdent, tempTexture.Identifier(), materialToBlit, 0);

    // ...then blit it back again
    cmd.Blit(tempTexture.Identifier(), cameraColorTargetIdent);

    // don't forget to tell ScriptableRenderContext to actually execute the commands
    context.ExecuteCommandBuffer(cmd);

    // tidy up after ourselves
    cmd.Clear();
    CommandBufferPool.Release(cmd);
  }

  // called after Execute, use it to clean up anything allocated in Configure
  public override void FrameCleanup(CommandBuffer cmd)
  {
    cmd.ReleaseTemporaryRT(tempTexture.id);
  }
}
CommandBuffer
You'll notice that unlike "old" ways of doing custom rendering in Unity we don't directly execute any rendering commands. We're not using any of the Graphics or GL methods. Instead everything is done through a CommandBuffer. We set up the commands we want to execute and then hand them over to the scriptable render pipeline to actually run them.
Magic Name
There's one "magic name" that you should be aware of. In our feature class (the one which extends ScriptableRendererFeature) if we have a public field named settings then Unity will pick up that referenced object and display its public fields nicely in the inspector when setting up the feature.
Using our Feature
With those files now in the project we can tell the SRP to use the new feature we've just defined.
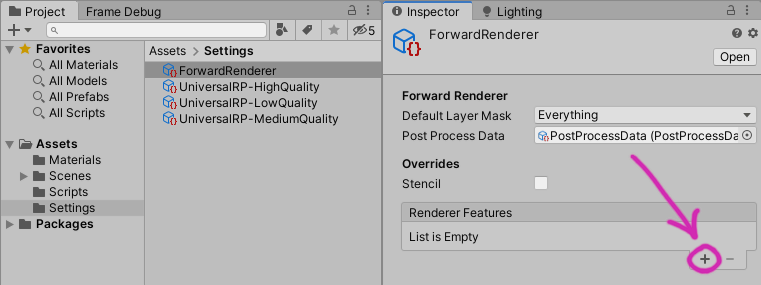
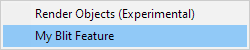
Any project using a scriptable render pipeline will have a renderer asset. Select that and the inspector will show a list of renderer features (which is probably empty.) Click the + symbol and Unity will find anything that extends ScriptableRendererFeature and offer to add that feature to the renderer.
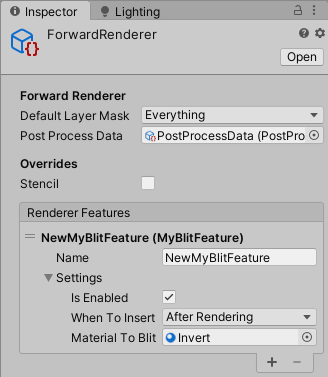
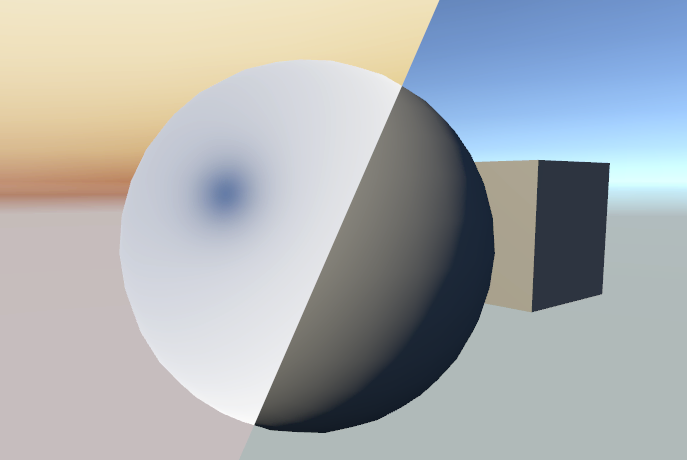
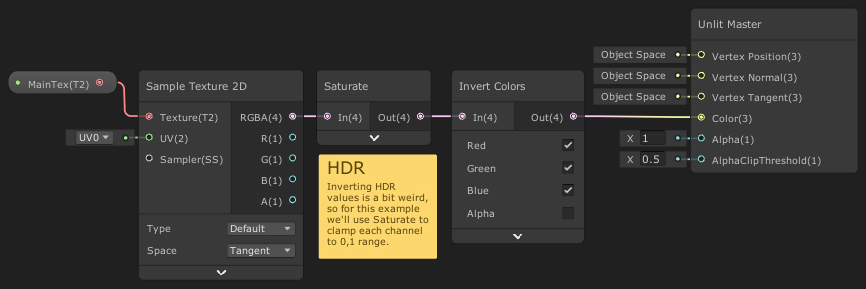
Now that the feature is added to the renderer you'll see the contents of its settings field available for modification. This example feature needs a material in order to do anything useful. I've made a colour inversion effect in the shader graph. Because it's being used to blit rather than to render a mesh it uses the unlit master for output and a texture with an exposed reference _MainTex as input.
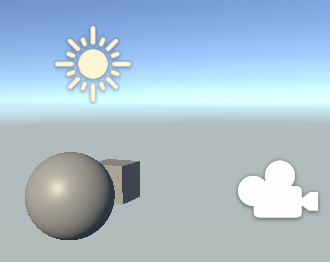
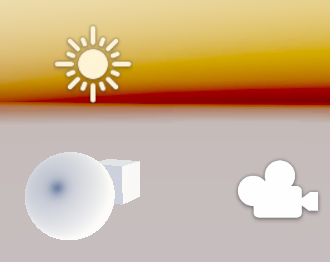
Once the feature is set up with a material you should immediately see it in effect - our modified SRP is used to render both the shaded scene view and the game view.
Frame Debug
When you're messing around with rendering Unity's Frame Debug tool is very useful for understanding what's going on. You can access it from Window > Analysis > Frame Debugger.
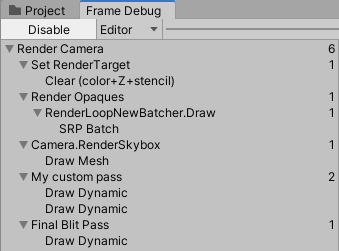
Your frame debugger may have significantly more steps in it than shown here. I've turned off anti-aliasing and shadows to keep it simple for this example. The thing to notice is that the feature we created is now slotted into the renderer, complete with the not very descriptive "My custom pass" label.
Where our feature is slotted in (and what that label is) can be modified in the feature's code. Try setting this feature to be slotted in just before the skybox is rendered, that way everything in the scene except the sky will be inverted.
You can click through to see what each step is doing. We'll recognise that "My custom pass" is first blit'ing the camera's buffer to a render texture using the custom shader we made and then blit'ing it back again with the default Hidden/BlitCopy shader.
RenderDoc
I should also mention RenderDoc which gives a more detailed breakdown of what exactly is happening at every step of your scene's render process. I find it especially useful when I need to know exactly what state texture and buffer data is in at a particular moment through the rendering process.
Going Further
There's a lot more to be said about custom renderer features. They can be used to implement a huge number of things, and offer just as many opportunities to replace your rendered scene with a black rectangle. Hopefully this at least gives you a starting off point to begin your exploration.
You might be interested in my tutorial on using a compute shader within a SRF to generate lens flare quads.