Decals are great for adding texture detail to a scene. You can transform an object's plain texture into something that looks unique with no need to actually make a unique texture. Because decals can be applied without needing to modify the underlying model they can be added at runtime too; a classic use case is to spawn decals to make a wall look like it has bullet holes after a player shoots at it.
As decals are separate from the models and textures they appear on they're especially useful in environment design. Rather than making several variations of a brick wall texture with different cracks you can use a single base texture and place crack decals while designing an environment. Iteration is faster as you can more easily change a decal's position than rework a texture.
At their simplest a decal could just be a textured quad that's placed next to the flat surface of an object. But being able to conform to complex surfaces is very useful so typically decals do some form of projection against the surface they're placed on.
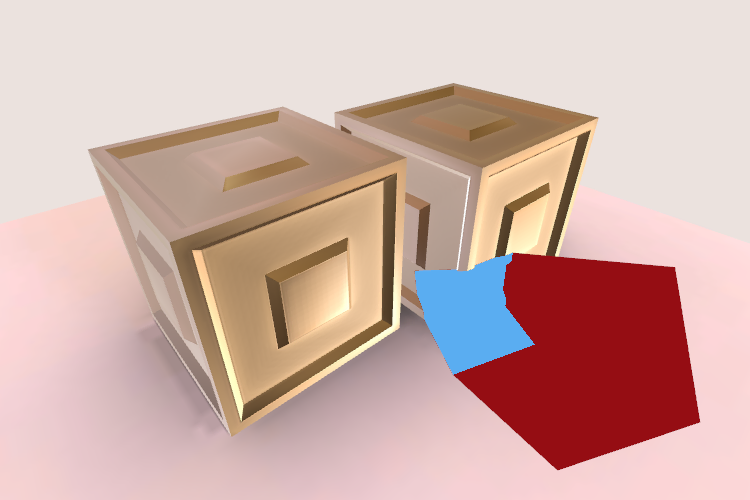
Here's a screenshot from Half Life: Alyx by Valve Software which criminally undersells a beautiful game, but also shows decals in action. The glowing paint is a decal applied to an otherwise nondescript wall, and a collection of bullet hole decals have been created by the player. Conveniently these two types of decal are rendered in the two ways we'll be examining.
Naming things is hard, and some things get named several times. I'm calling these two decal techniques "view-space projection" and "generated mesh" but they're certainly referred to by other names. If there's better and/or more commonly accepted names feel free to let me know and I'll update the labels.
View-space projection
Today this tends to be what people initially think of when talking about decals. View-space projection decals are rendered by performing the projection process during rendering. Each decal exists in the scene as a simple mesh—usually a cuboid. The decal is rendered using a fragment shader that looks at the world position of whatever else was rendered where that fragment is placed. Using that world position with the position and size of the decal itself it works out what part of the decal's texture (if any) should appear in the fragment.
Click or touch in the scene to move the decal.
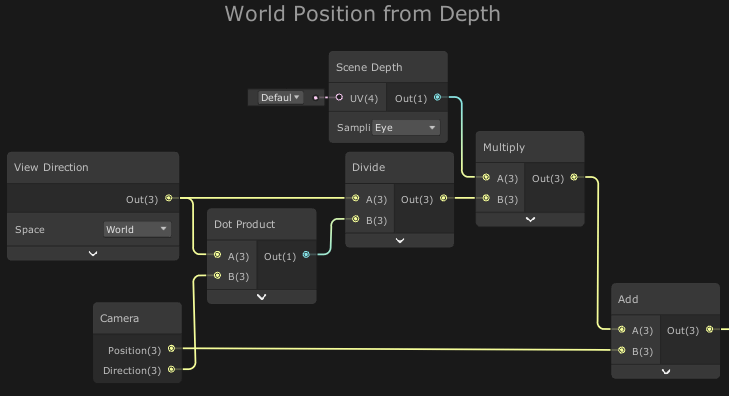
Above is a simple scene with a decal that's rendered using the view-space projection method. The other objects in the scene have had their depth information written to texture that's made available to the decal's shader. By knowing that scene depth and the camera's position the shader can reconstruct a world position for each point, then work out how it should sample the decal's texture to match the position.
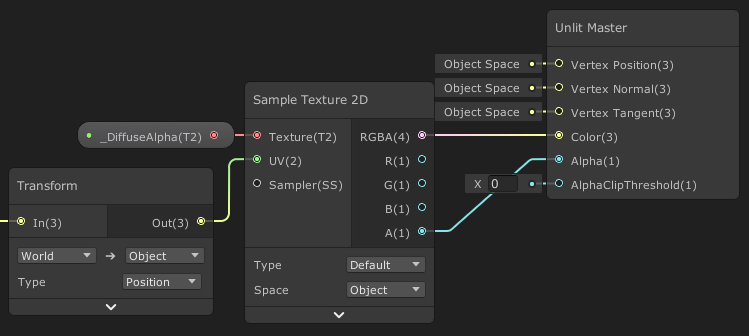
Once you have a world position for a fragment it's just a case of transforming from world space to the decal's object space. That might sound fancy but is just multiplying the world position by the inverse of the decal's model matrix. Here's a basic implementation in Unity's shader graph, which does that step with a single transform node.
The main downside of this way of rendering decals is that you need to sample the scene depth for every point on the decal's cube. Sampling the scene depth texture and a bit of maths to reconstruct world position isn't extremely taxing, but it can add up if you have a lot of decals in a scene.
You'll need to provide that scene depth in a readable texture, but as it's also used for other rendering techniques there's a good chance you'd be doing it anyway. The universal render pipeline settings asset has a checkbox for generating a depth texture, as well as an optional override on the camera itself.
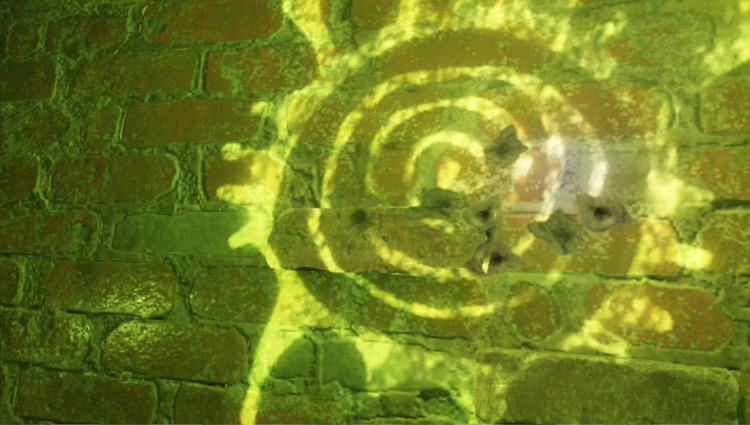
Here fragments which get processed but aren't part of the drawn decal are coloured red. You can see that for some decal positions there's a larger wasted area. You can also get an idea of the cuboid used to render this decal.
There are optimisations to be made here. Scaling the decal's cuboid to fit as close as possible to the surface it's projecting against reduces the "red" area of wasted work. Similarly if you know the camera will never be placed within the cuboid you can cull backfaces and set zTest to lessOrEqual. Otherwise you should do as in this example and cull front faces with the zTest set to greaterOrEqual. The shader can detect that it is in the red area after calculating world position but before sampling the decal's texture, and discard the fragment at that point. That kind of conditional early exit doesn't always help performance in shaders but may be beneficial here.
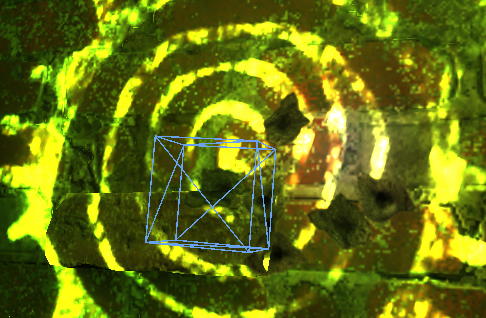
Going back to our example from Alyx we can use RenderDoc to see that the the bullet hole decals are rendered in this way. The image above shows the cube mesh that's used to draw one of the decals. To create the bullet hole all the game has to do is place an appropriately rotated cube where the bullet hit and render it with the decal shader. The bullet decals are small so the total view area that can need processing will be low. The decals are also removed from the scene after a time delay to prevent too many building up.
Generated mesh decals
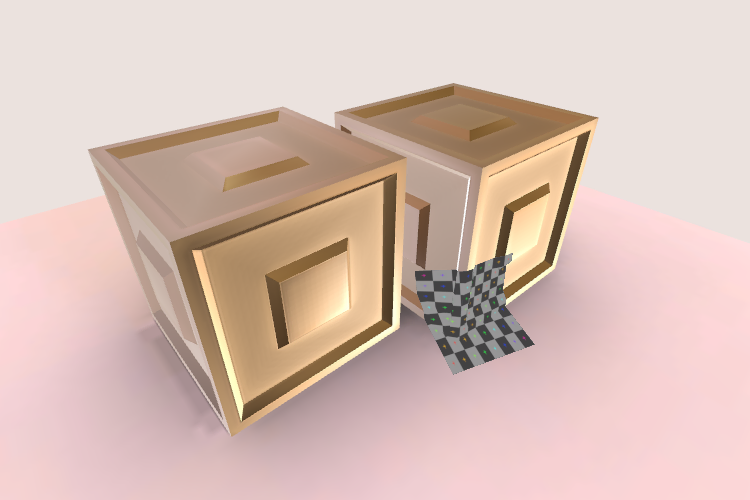
Earlier we talked about the simplest possible decal being just a textured quad. A generated mesh decal is an extension of that, creating a mesh that matches the target surface that can be rendered without any need for special shaders. The downside is creating that custom mesh is far slower than just creating the cube needed to display a viewspace decal.
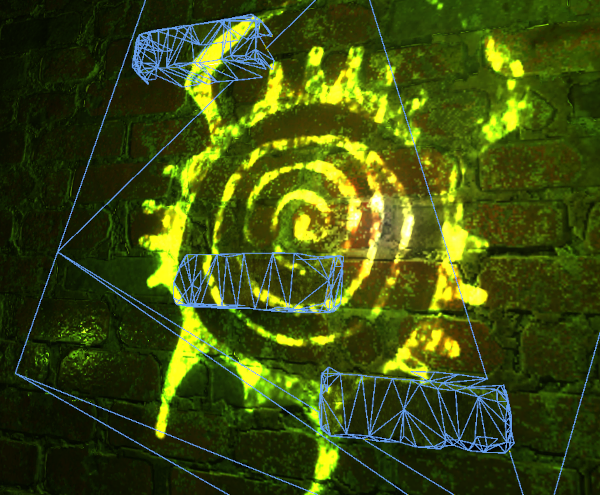
Alyx uses generated mesh decals in a few places for adding texture decorations to the scene. The wireframe mesh shown above is the mesh of the painting decal (technically it's two meshes that I combined in the image for convenience.) The decal's mesh isn't just a copy of the mesh used by the flat wall and the extruded bricks. Instead it's made up of the triangles near the decal, clipped to fit within the decal's bounds. You can see how the wall mesh forms a rotated quad shape, but split into extra triangles. Those extra triangles are there because it was generated from the wall mesh's original triangles getting clipped.
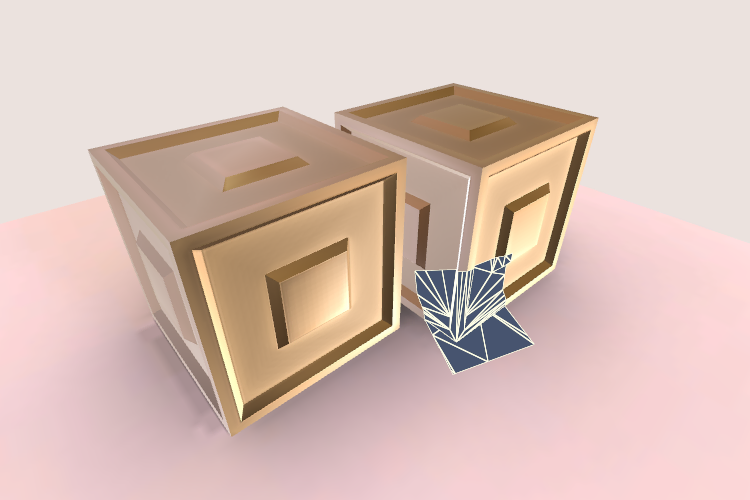
Here's our example scene again, this time with a generated mesh decal that gets regenerated whenever you move it. I've swapped out the usual shader for one that shows the wireframe of the decal's generated mesh. Even on a modern computer you'll notice the decal is less responsive than the viewspace versions because of how long it takes to regenerate the mesh.
Generated mesh decals are a poor choice if the decal needs to be quickly placed in the world during interactive segments or if it needs to adapt to changing surfaces. But if the decal is being used to decorate a scene or object and isn't going to need to be regenerated then they can provide a rendering performance improvement over viewspace decals. This makes them ideal for permanent scenery decorations.
The process for generating the decal's mesh involves examining nearby scenery triangles, transforming them into the decal object's space and clipping them to fit within its bounds. The exact process is outside the scope of this article, but you can see a basic implementation here. The key simplification is that by transforming the triangles into the decal object's space you're clipping them against an axis aligned box which is a far easier set of geometry operations.
Unity Legacy: Redraw and overlay
This is the technique used by the "old" projector rendering system in Unity. Similar to the generated mesh decal this renders a mesh placed on the surface. Unlike that it doesn't generate a new mesh and instead redraws the entire mesh of the objects that it's near but using a different material. Often most of the redrawn mesh will be transparent and effectively wasted. Performance cost quickly builds up with these decals. If several are placed near large objects then a lot of vertices and fragments need to be processed, even if the majority of fragments get discarded.
The advantage to this approach is that unlike view-space projection it doesn't need to read from the scene's depth buffer which isn't available on some platforms. Today that limitation is rare so more efficient methods should be used.
Unity HDRP: Prepass and apply
I don't have a detailed understanding of how the HDRP handles its decals, but as best I can tell the process is broadly:
- Depth-only pass for the scene.
- Decals pass with depth test writing the colour (and normals, metallic, and occlusion values) from the decals into a set of screen sized buffers. Decal projection is performed here in the fragment shader, using the earlier depth pass to find world-space position.
- Standard deferred rendering of the scene to g-buffers, but the fragment shaders also read from those decal buffers and incorporate them.
- The rest of the deferred rendering process continues as it would without decals. The g-buffers are used to produce a shaded final image.
A drawback here is needing to have a whole extra set of screen sized buffers taking up space in memory and needing to be sampled as part of rendering. I would expect the cost of writing into those decal buffers to have the same general performance characteristics of the view-space decals we discussed earlier.
It's worth mentioning that deferred rendering makes some nice decal effects possible. For example a decal can write to only the normal buffer, making a surface look dented while maintaining its base colour and other properties.
During the hour working with the HDRP to write this section of the article I've had Unity crash more than the combined past 6 months of using using the URP.
Choose your decal technique
View-space projection: when you need to create the decal at runtime or have it adapt to changing surfaces. Great for dynamic effects like bullet holes.
Generated mesh: to get better rendering performance at the cost of the decal being static. Great for environment decoration.
If you're looking to try generated mesh decals in Unity's URP, you may want to try the system I made. It's free and open source.